

RV Solar Sizing Guide: How Many Panels Do You Need?
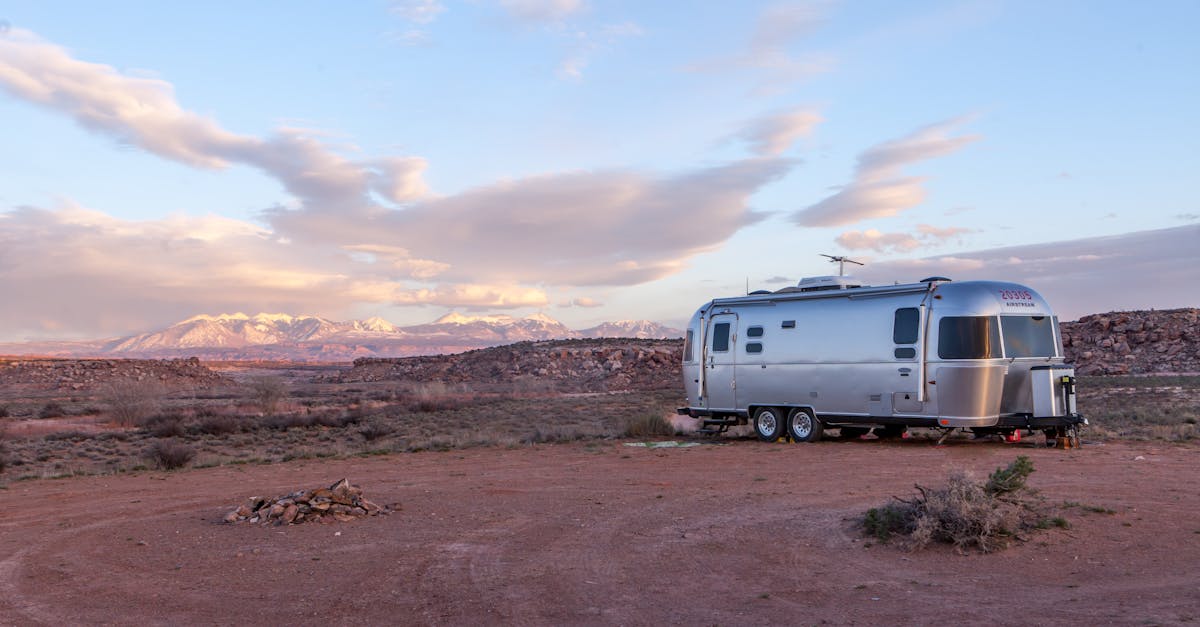
You’re parked at a red-rock campsite outside Sedona. No hookups, no generator rumbling three sites over, just silence and a view that makes you forget what day it is. The fridge is running, your phone is charging, and the fan is keeping the afternoon heat at bay — all powered by the panels on your roof. That’s the promise of RV solar.
But before you get there, you have to answer the question that stops most people in their tracks: how many solar panels do I actually need? Too few and you’re rationing power by noon. Too many and you’ve spent thousands on capacity you’ll never use. The answer isn’t a guess — it’s a formula. And this guide walks you through every step.
Step 1: Calculate Your Daily Power Consumption
Everything in solar sizing starts with one number: how many watt-hours (Wh) your RV consumes in a day. Get this wrong and nothing else matters — your panels, batteries, and controller will all be the wrong size.
The simplest way to measure is with a watt-meter (like a Kill-A-Watt) plugged inline with your appliances for 24 hours. If you don’t have one, use the spec sheet method: multiply each appliance’s wattage by how many hours you run it daily, then add them up.
Here’s a reference table for common RV loads:
| Appliance | Watts | Daily Hours | Daily Wh |
|---|---|---|---|
| LED lights (all) | 24W | 4h | 96 |
| Water pump | 60W | 0.5h | 30 |
| 12V RV refrigerator | 50W | 12h | 600 |
| Laptop | 55W | 3h | 165 |
| Phone charger | 15W | 3h | 45 |
| TV | 80W | 3h | 240 |
| Fan (12V) | 40W | 6h | 240 |
| Microwave | 1,000W | 0.25h | 250 |
| Coffee maker | 1,000W | 0.15h | 150 |
| CPAP machine | 45W | 8h | 360 |
Your daily total will fall into one of three general categories:
- Conservative (~800 Wh/day): Lights, phone, 12V fridge, water pump, fan. This is the stripped-down boondocking setup — LED lighting, no TV, no microwave, propane for cooking and heating.
- Moderate (~1,800 Wh/day): Everything above plus a laptop, TV, coffee maker, occasional microwave, and a CPAP. This is the sweet spot for most part-time boondockers who want comfort without excess.
- Heavy (~4,000 Wh/day): Residential refrigerator, multiple devices, washer, extended microwave and coffee maker use. Full-time off-grid living with most of the comforts of home.
You can use the free Arvee AmpSmart calculator to build your specific appliance list and get a precise daily watt-hour total.
Step 2: Understand Peak Sun Hours
Here’s where most people get tripped up. A “peak sun hour” (PSH) is not the same as an hour of daylight. One PSH equals one hour of sunlight hitting your panels at an intensity of 1,000 watts per square meter. A long summer day might have 14 hours of daylight but only 5–6 peak sun hours — the rest is too weak to generate meaningful power.
Your location’s PSH determines how much energy your panels can actually produce. The same 400W system that’s a powerhouse in Arizona becomes barely adequate in the Pacific Northwest.
| Region | Annual Avg PSH | Summer Avg | Winter Avg |
|---|---|---|---|
| Southwest (AZ, NM, NV) | 6.4–6.8 | 7.1–7.4 | 5.8–6.2 |
| Great Plains (KS, OK, SD) | 5.2–5.8 | 5.9–6.3 | 4.6–5.3 |
| Florida | 5.7 | 6.2 | 5.3 |
| Texas | 4.9 | 5.5 | 4.4 |
| California | 5.4 | 6.2 | 3.4 |
| Southeast (GA, SC) | 4.7–5.1 | 5.2–5.7 | 4.1–4.2 |
| Midwest (MN, WI, MI) | 4.0–4.5 | 4.7–5.4 | 2.7–3.5 |
| Pacific NW (OR, WA) | 3.6–4.0 | 4.8–5.7 | 1.9–2.6 |
Step 3: The Solar Sizing Formula
With your daily consumption and your location’s peak sun hours, you can calculate exactly how much solar you need. The formula includes a 1.25x multiplier to account for real-world efficiency losses — wiring resistance, controller conversion, inverter overhead, and the fact that panels rarely produce their rated wattage.
The formula:
Required Solar Watts = (Daily Wh x 1.25) / Peak Sun Hours
Let’s work through two examples that show how dramatically location changes the equation.
Example 1: Moderate user in Arizona (summer)
- Daily consumption: 1,800 Wh
- Peak sun hours: 7.4
- Required watts: (1,800 x 1.25) / 7.4 = 304W
- Recommendation: a 400W system gives you comfortable headroom
Example 2: Same user in Oregon (winter)
- Daily consumption: 1,800 Wh
- Peak sun hours: 1.9
- Required watts: (1,800 x 1.25) / 1.9 = 1,184W
- Recommendation: you’d need 1,200W — four times more panels for the same lifestyle
Same person, same appliances, same daily habits. The only difference is location and season. This is why sizing for your worst-case scenario matters if you plan to travel year-round.
Choosing Your Panels
Monocrystalline panels dominate the RV market for good reason — 20–24% efficiency, strong low-light performance, and the highest power output per square foot. Polycrystalline panels (13–18% efficiency) are cheaper but require more roof space for the same output. For an RV where roof real estate is limited, mono is the clear choice.
For mounting, you have three options. Rigid aluminum-framed panels are the most durable and perform best because air flows underneath, keeping them cooler. They’re heavy (~40–50 lbs for 400W) but last 25+ years. Flexible panels weigh a fraction of that and conform to curved roofs, but they trap heat when flush-mounted and typically last only 5–10 years. Portable/foldable panels can be positioned for optimal angle and moved to avoid shade, but they require setup and takedown every day.
Common panel sizes and what they’ll produce with 5 peak sun hours:
| Panel Size | Daily Output (5 PSH) | Best For |
|---|---|---|
| 100W | 350–500 Wh | Phone/laptop charging, lights only |
| 200W | 700–1,000 Wh | Small RV, minimal loads |
| 400W | 1,400–2,000 Wh | Mid-size system, moderate use |
Charge Controllers: MPPT vs PWM
Your charge controller regulates power from the panels to the batteries — and the type you choose affects how much of that power actually reaches storage.
MPPT controllers harvest 20–30% more energy than PWM controllers by converting higher panel voltage down to battery voltage efficiently. They also perform significantly better in low light and cool weather. For any system over 200W, MPPT pays for itself quickly. PWM controllers work fine for very small systems under 100–200W where the price difference isn’t justified.
Wiring: Series vs Parallel
How you wire your panels together affects shade tolerance and wire sizing.
Series wiring increases voltage while keeping amperage the same. This allows thinner wire gauges and longer runs, and works best with MPPT controllers. The downside: shading one panel reduces output of the entire string.
Parallel wiring keeps voltage the same and increases amperage. Each panel operates independently, so shading one panel only affects that panel. The trade-off is thicker wires and higher amperage.
For setups with four or more panels, a series-parallel combination — pairs of panels wired in series, then the strings wired in parallel — gives you the best of both worlds: voltage boost with shade tolerance.
Matching Your Battery Bank
Solar panels generate power during the day, but you use power around the clock. Without a properly sized battery bank, all that afternoon solar production disappears the moment the sun drops below the horizon.
LiFePO4 (lithium iron phosphate) batteries have become the standard for RV solar systems. They deliver 80–100% of their rated capacity (compared to 50% for AGM or lead-acid), last 3,000–5,000 charge cycles versus 200–800 for lead-acid options, and weigh roughly half as much. A single 200Ah LiFePO4 battery provides the same usable energy as a 400Ah lead-acid bank. The upfront cost is higher — around $400–800 per 100Ah versus $150–400 for AGM — but the lifespan and performance make lithium cheaper over time.
Rule of thumb: plan for 300W of solar for every 100Ah of LiFePO4 battery capacity. This ratio keeps your batteries fully charged on a typical sunny day. A 400W solar array pairs naturally with a 200Ah lithium bank. A 1,000W array wants 300–400Ah of storage behind it.
Complete System Examples
| Weekend Warrior | Part-Time Boondocker | Full-Time Off-Grid | |
|---|---|---|---|
| Daily use | 600–800 Wh | 1,500–2,000 Wh | 3,000–5,000 Wh |
| Solar | 200W (1–2 panels) | 400–600W (2–4 panels) | 800–1,200W (4–6 panels) |
| Battery | 100Ah LiFePO4 | 200–300Ah LiFePO4 | 400–600Ah LiFePO4 |
| Controller | 20A MPPT | 30–40A MPPT | 60–85A MPPT |
| Inverter | 1,000W | 2,000W pure sine | 3,000W pure sine |
| DIY cost | $500–$900 | $2,000–$4,000 | $5,000–$10,000 |
The Weekend Warrior setup handles lights, phone charging, a 12V fridge, and a fan for short weekend trips. The Part-Time Boondocker adds a laptop, TV, coffee maker, and occasional microwave for week-long dry camping trips. The Full-Time Off-Grid system runs a residential fridge, multiple devices, and supports extended off-grid living.
What About Running AC on Solar?
This is the question everyone asks, and the honest answer is: it’s possible but expensive. A 13,500 BTU rooftop AC unit draws 1,200–1,400 watts running. Over 6–8 hours, that’s 7,200–11,200 Wh per day — more than most entire RV systems consume. Running AC on solar realistically requires 2,000W+ of panels, 800Ah+ of LiFePO4 batteries, and a budget north of $10,000.
Most boondockers avoid it entirely and use alternatives instead: parking in shade, running roof vent fans, using reflective window covers, and migrating to cooler elevations during summer. If you do need AC off-grid, a generator for peak heat hours paired with a moderate solar system for everything else is far more cost-effective than trying to power it all with panels.
What Will It Cost?
| System Size | Capability | DIY Cost | Professional Install |
|---|---|---|---|
| 100–200W | Phones, lights, fans | $300–$600 | $500–$900 |
| 300–400W | Small fridge, laptop, fan | $700–$1,200 | $1,000–$1,800 |
| 500–800W | Microwave, TV, CPAP | $1,300–$2,500 | $2,000–$3,500 |
| 1,000W+ | Full system, AC backup | $3,000–$6,000 | $4,500–$8,000+ |
DIY installation saves 30–50% over professional install, and most RV solar systems are straightforward enough for a competent DIYer. Where you should not cut corners: wire sizing (undersized wire creates heat and voltage drop), roof penetration sealant (water damage costs far more than the panels), and the charge controller (a cheap PWM controller on a large array wastes the investment in panels).
Most RVers recoup their solar investment in 3–5 years through eliminated campground hookup fees and generator fuel savings.
Common Sizing Mistakes
Guessing instead of measuring. Use a watt-meter for 2–3 days to measure actual consumption. Guesses are almost always wrong — usually low — and lead to undersized systems.
Ignoring the battery bank. Solar panels without adequate battery storage are wasted. If your panels produce 2,000 Wh but your batteries can only store 1,200 Wh, the excess energy has nowhere to go.
Using rated output instead of real-world output. Panels rarely produce their rated wattage. Heat, dust, angle, and clouds all reduce output. Use 75% of rated capacity as your planning figure.
Forgetting phantom loads. Your inverter’s idle draw alone can consume 600 Wh per day. LP detectors, control boards, and clocks add more. These invisible loads need to be part of your daily consumption calculation.
Sizing for the best conditions. A system designed for Arizona summer will fall short in a Pacific Northwest winter. If you travel year-round, size for the worst conditions you expect to encounter — or accept that you’ll supplement with shore power or a generator during low-sun months.
Putting It All Together
Solar sizing comes down to three numbers: your daily watt-hour consumption, your location’s peak sun hours, and the formula that connects them. Measure your consumption honestly (or better yet, with a watt-meter), look up the PSH for where you camp, and the math tells you exactly how many watts of solar you need. Match your battery bank to your panel array, choose an MPPT controller sized for future expansion, and you have a system spec.
Start small if you’re unsure. A 400W system with a 200Ah LiFePO4 bank covers most part-time boondockers, and an oversized controller makes it easy to add panels later. The most expensive mistake isn’t buying too little — it’s guessing instead of measuring and getting the wrong system entirely.
If you haven’t calculated your daily consumption yet, the Arvee AmpSmart calculator builds your appliance list and gives you a precise watt-hour target. It’s the fastest way to go from “I have no idea” to a concrete number you can plug into the formula above.
For more on the electrical systems that work alongside your solar setup:
- RV Shore Power Explained: 30 Amp vs 50 Amp — what happens when you do plug in
- RV Battery Types Compared — deep dive into lithium vs AGM vs lead-acid
- RV Inverter Sizing Guide — making sure your inverter can handle the load
- Boondocking Power Management — stretching your power budget off-grid